Sunday 25 December 2011

Christmas Fruit Cake

MERRY CHRISTMAS!

I hope that everyone is having a wonderful day wherever in the world you are or whatever you are doing today. I am sure that a lot of people are feeling as stuffed as their turkey by now but I guess the diet can start tomorrow; for today tough the food gorging is the way ahead.

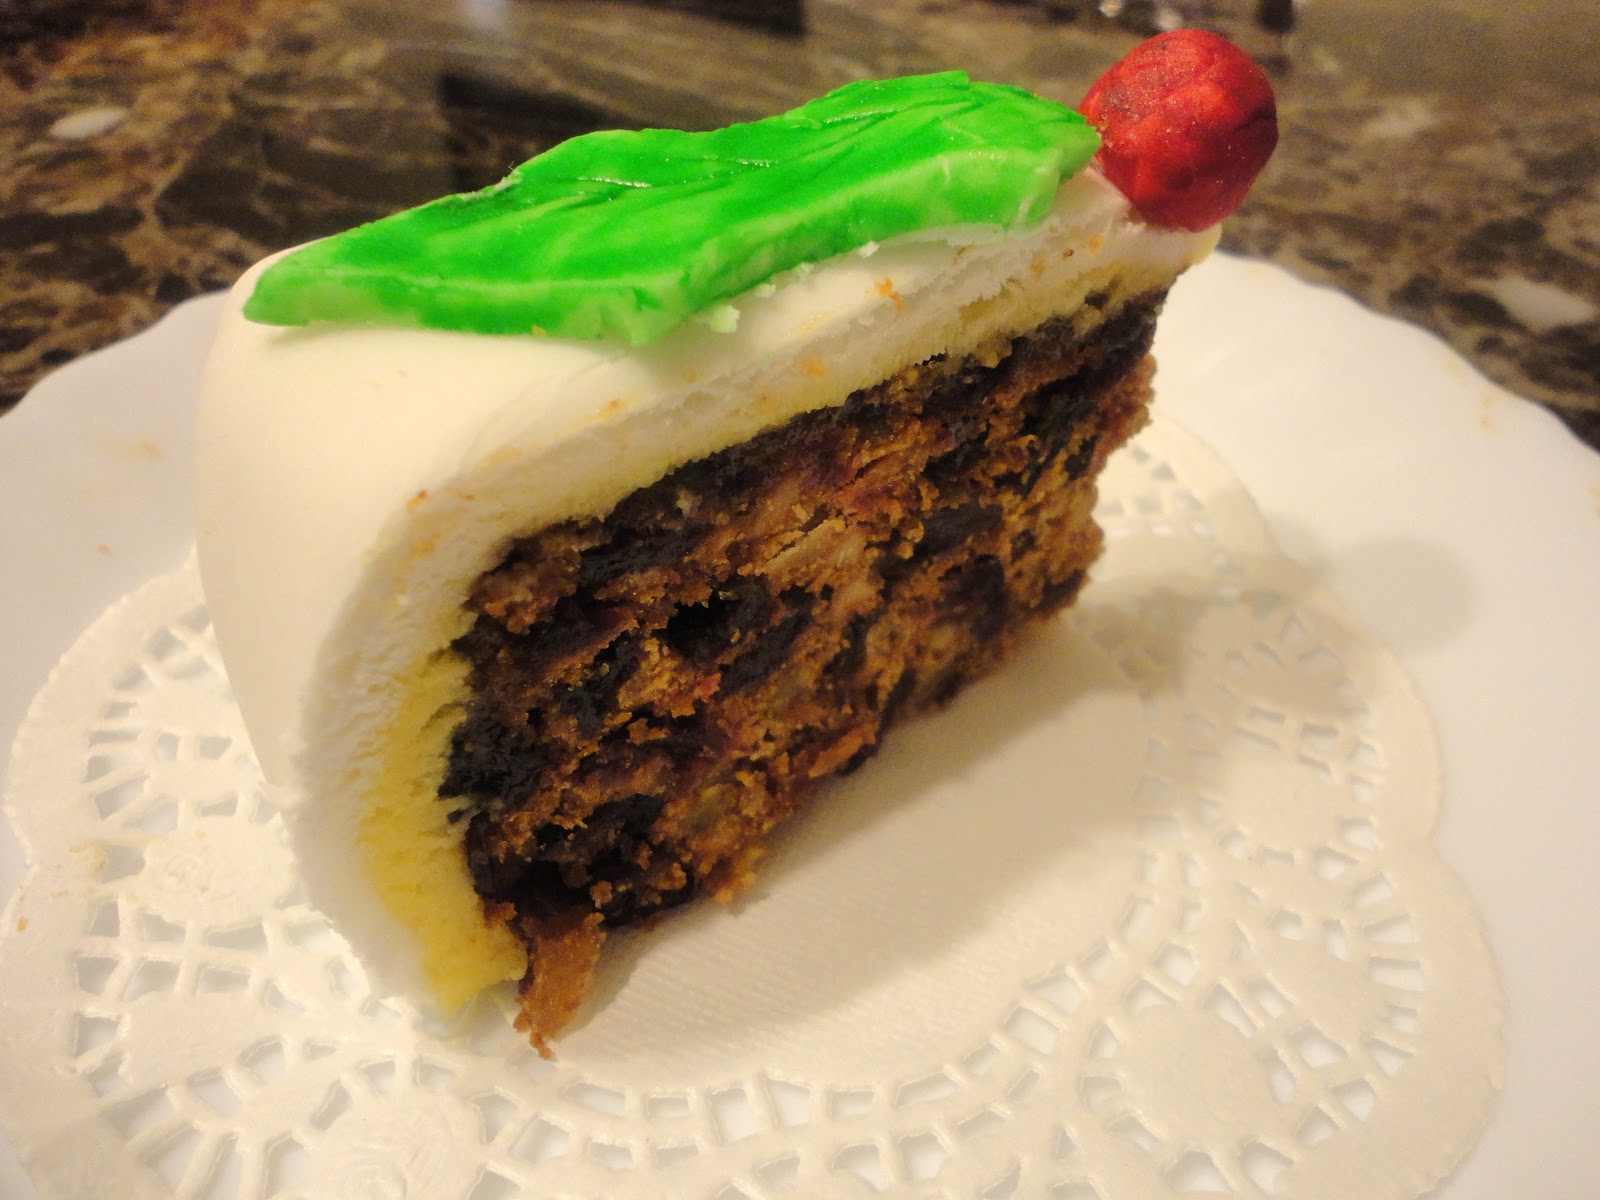
If you have ever had Christmas cake you'll understand what I mean when I say it's rich, dense and sweet. It's something that you wouldn't have everyday but would indulge in during the festive period. The cake uses an extensive list of ingredients but don't be put off by the length as it's quite a simple process; you just mix everything together and bake. I made this cake pretty last minute, but if you had time and wanted to make it several days before you want to eat it you could feed the cake with brandy to add extra moistness and a depth of flavour. Also you don't have to cover it in marzipan and icing if you don't want to, as it looks rather pretty when it is bare.

I had a bit of a minor error with this cake, in other words I burnt it a little. Most recipes say to leave the cake in the oven for 3 hrs so I took their word. I realised after it was too late that this is way too long. I guess it depends on your oven but make sure you check if it is done after 2 hrs (try not to open the oven door too many times before this).

Preparation time: 4hrs
Serves: At least 6 (very large portions)

Recipe:

Ingredients
225g plain flour
200g butter
4 beaten eggs
200g dark brown sugar
1 tsp mixed spice
1/2 tsp ground cinnamon
1/4 tsp ground nutmeg
1/4 tsp salt
1/4 tsp vanilla essence
1 1/2 tsp rum flavouring
2 tbsp black treacle
500g mixed dried fruit
200g mixed peel chopped
75g glace cherries chopped
75g cranberries chopped
50g mixed nuts chopped
200g marzipan
200g white ready made (sugar paste) icing
2 tbsp apricot jam 
optional: brandy 

Method:
1. Preheat the oven to 150C.

2. Grease a 8" circular cake tin, and line with baking parchment.


3. Mix together all the dry ingredients: dried fruit/ currants, flour, ground spices, salt.


4. Cream the butter with the sugar. Mix in the vanilla essence, rum flavouring and black treacle. Then add the beaten egg a little at a time alternating with adding the flour mixture a little at a time.


5. Pour the mixture into the baking tin. Then make sure that there are no air spaces in the mixture, and flatten the top with the back of a spoon. Make a small well in the middle of the mixture as this will rise once in the oven.


6. Bake for around 2 hrs, the cake may need longer in the oven; check if it is ready by inserting a skewer into the centre of the cake and if it comes out clean it's done.

7. Once done, remove from the oven and let the cake cool for 1 hr before removing it from the tin.


8. At this point you may want to soak the cake in brandy; pierce holes on the top of the cake using a skewer and pour around 3-4 tbsp of brandy on top, you can pour a few tablespoons of brandy over the cake every week before you are wanting to eat it. Store the cake in an airtight container wrapped in foil.

9. If you want to cover the cake in icing, first make the cake completely flat so cut of the top of the cake if risen. If you find that the cake is slightly burnt on the outside, just cut it of making sure that cake is flat and neat as possible. Place the cake onto a cake board or plate.


10. First heat the apricot jam on the hob or in the microwave till runny. Then spread a layer of jam over the cake using a pastry brush.


11. Now dust the work surface with icing sugar. Work the marzipan till it is soft. Then roll it out till it is around 3mm thick and big enough to cover the top and sides of the cake.


12. Drape the marzipan over the cake and smooth over from the middle outwards. Cut off any excess marzipan from the sides using a knife.


13. Now wet the marzipan with water (not too much) using your fingers or a brush; this is so that the white icing will stick.

14. Roll out the white icing the same way, shape and size. Trim off any excess icing.


15. Drape the white icing over the cake and smooth over from the centre outwards. Trim off any excess.

16. Now make the decoration using any left over white icing. You can colour the icing by either kneading in the food colouring into the icing or by painting it on after you have moulded the shapes.Make sure that you dab the cake with water before you place the decoration onto the cake so that it sticks better.

 17. Add any finishing touches such as ribbon and eat.


Source
This recipe was adapted from BBC Food. 


A post from Fullest of Life

A Gingerbread House and a Gingerbread Men Family


Do you like my gingerbread family? I think me and my sister had more fun making and decorating them then a little kid would. It's a time when you can go wild with the glitter, sprinkles, and sweeties. Gingerbread men are great to share with family and friends, they most certainly are not just for children; I made little gift parcels of mince pies and gingerbread men for my friends for Christmas and they really appreciated the thought, time and effort that went into making them. Or if you wanted more sophisticated gingerbread just use a different shaped pastry cutter, as gingerbread itself is a great biscuit. Fact.


I took on the challenge of making a gingerbread house last year, it took quite a bit of time and effort but I guess that varies depending on how elaborate you want your decorations to be. I was actually quite proud after constructing my own house and didn't feel like demolishing it too soon. It literally is like a piece of art. So it was admired for a few days before bit by bit ending up in our tummies, and I can say it tasted just as good as it looked. You don't have to eat the gingerbread house if you are too destraught at the idea that all the effort will end up in crumbs (literally) as it will keep and won't go mouldy (as long as you use the right sweets which don't melt/ spoil too easily). If only there was a life size gingerbread house; that would be absolutely awesome! Just imagine, being able to nibble the walls when you feel peckish and the abundant stock of sweets and candy. If only I had an oven big enough it'd already be a reality and not just in my dreams or in Hansel and Gretel's fairytale. 


Gingerbread Men Recipe:
For the gingerbread men I used the recipe from BBC Good Food, but I advise that you add more ground spices than the recipe mentions to get that extra kick.

For the writing icing:

Ingredients
1 cup of icing sugar
1 tsp lemon juice
1/2 egg white

 Method
 1. Add the lemon juice to the icing sugar, then add the egg white to the icing sugar very little at a time whilst stirring in between each addition. 
2. The icing is ready when it is a thick, fluid consistency (it should hold it's shape when you write with it).
3. Pour the icing into a piping bag and start decorating!
4. Allow to dry for at least 1 hr.


A post from Fullest of Life


Friday 23 December 2011

Festive Golden Mince Pies


It's Christmas in 2 day! I love this time of year, and I enjoy the preparations and lead up the the big day as much as the day itself. It's lovely seeing Christmas trees, lights and decorations everywhere, especially in the nighttime; it makes an otherwise dull time of year more cheerful and warm.

You know Christmas is around the corner when you eat your first mince pie; it's basically Christmas in an edible form, filled with sugar, spice and all things nice. So have you had your annual bite of mince pie yet? They are everywhere you look in the shops and I personally find it difficult to resist. Also how do you like to eat your mince pie? I love mine warm, if you give them a blast in the microwave for a few seconds just before eating they're absolutely gorgeous, and even better accompanied with cream/ ice-cream. The other day I bought some mince pie flavoured ice-cream being quite intrigued by the idea when I saw it, and I have to say that it was one of the best ice-creams I have had! It literally was mince pie in ice cream form, and if you find mice pies stodgy and heavy this is the perfect alternative so you don't miss out on this festive treat.

I've never made my own mince pies before but if I had know that they are this easy I probably would have. I think I have just started a new Christmas ritual for myself. It's so much more satisfying eating home made mince pies than the shop bought things; but I guess this is true for most stuff. An added bonus of making your own is that your kitchen will smell delicious when you bake the mince pies. Also you can have a lot of fun decorating them. I bought edible gold spray for food, and I've been itching to use it a.s.a.p, so this was the perfect opportunit and hopefully you don't think I went overboard with the spray; I think it adds a 'special' touch. But if you don't want too bee too fancy, just dust the pies with icing sugar and they will still look stunning. Why not share the mince pies you make, I handed some of mine out as presents, and I think they went down pretty well.


Preparation time: 1hr 15 mins
Makes: 12 medium sized mince pies with lids for half of them

Recipe:

Ingredients

1 411g jar of shop bought mincemeat (you can make your own if you have the time)
200g plain flour
100g cooled butter, cut into cubes
2 beaten eggs (1 for the pastry and one for the egg glaze
1tbsp icing sugar plus extra for decorating
gold food spray for decorating

Method


1. Rub the butter into the flour and icing sugar using your fingertips till the mixture resembles breadcrumbs.


2. Add 1 beaten egg to the flour bit by bit as you mix to form a dough (you may not all of it). The dough is ready when it comes together and can form a ball without being too dry or too sticky. Or you can just add all the ingredients into a food mixer and let it do all the work.


3. Wrap the dough in clingfilm and refrigerate for a minimum of 30mins.

4. Preheat the oven to 200C or gas mark 6.

5. Lightly flour the work surface and roll out the pastry till it is around 3mm thick (the thickness of a pound coin). Cut out the bases for the mince pies using a round pastry cutter and place them onto the bottom of mini tart baking tins or cupcake holes in a cupcake tray. You can cut out lids for the mince pies too using a smaller pastry cutter or cut out stars to decorate mince pies without lids. Re roll any left over pastry.

6. Now spoon around a table spoon full of mince meat into each pie.


7. Cover the mince pies with pastry lids. This recipe was only enough to cover half the mince pies with lids. Glaze the pastry with beaten egg, and using a knife/fork make small holes in the pastry to allow steam to escape.


8. Bake the mince pies in the oven for 10-15mins till golden brown. I baked the stars for the uncovered mince pies separately as I wanted to coat them with gold spray before adding to the mince pie, if you don't want to do this just bake everything together.
 

9. Allow the mince pies to cool. Then spray the pastry with edible gold spray and dust with icing sugar. Now add the golden stars to the uncovered mince pies.

10. Eat.


Ideas:
1. Use puff pastry instead of the sweet shortcrust pastry used in this recipe.
2. Make mince pie toasties with the left over mince meat.
 
Source:
Good Food Channel


A post by Fullest of Life