HAPPY NEW YEAR!
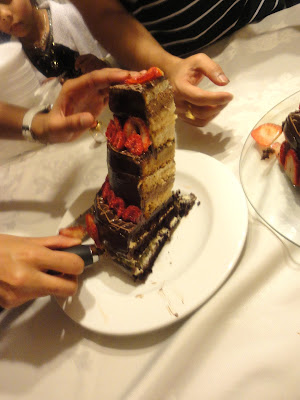
The cake turned out pretty well; the chocolate cake was moist, and the vanilla cake was so light. The chocolate ganache definitely tied everything together working well with all the flavours and gave the cake a nice glossy finish. It was good that there were 3 different types of cake as this meant the everyone got what they wanted, or a bit of everything for people like me.
If you want to make this cake, you will need whole day free; it does take quite a bit to time and effort, so if you're lazy then you may want to choose an easier recipe of just make 1 flavour cake and filling rather than going for the trio.
This cake was inspired by 'Dessert First Girl' and 'The Sweet Art', I ended up combining the 2 different cakes to make this.
Recipe
The Base Tier: Chocolate Cake
20cm cake pan
Follow the recipe on 'Food and Wine', and split the mixture into 2 cake tins or bake in the same tin 3 times.
The Middle Tier: Caramel Cake
15cm cake pan
Follow the recipe on 'Dessert First Girl' for the caramel cake- make sure you double the quantities for the recipe.
The Top Tier: Vanilla Cake
12cm cake pan
Follow the recipe on 'Dessert First Girl' for the vanilla cake- original quantities.
Chocolate Cream Filling
Follow the recipe on 'The Sweet Art' for the chocolate mousse filling.
Caramel Cream Filling
2 cups double cream (whipping cream)
6 tbsp caramel syrup (recipe on 'Dessert First Girl')
Whisk the cream and caramel syrup together till stiff peaks are formed. Be careful not to over-whisk otherwise the mixture will curdle.
Vanilla Cream Filling
2 cups double cream (whipping cream)
2 tbsp icing powder
1 tsp vanilla extract
Whisk the cream, icing powder and vanilla extract together till stiff peaks are formed. Be careful not to over-whisk otherwise the mixture will curdle.
Chocolate Ganache
Follow the recipe on 'Dessert First Girl' and triple the quantities.
Assembly
1. Cut all the cakes so that they are level on the upper and lower surfaces.
2. Cut the caramel and vanilla cake into equal layers (I did 3 layers for each tier). It is crucial that the cake is absolutely flat on each layer, otherwise the cake may have a tilt.
3. Spread the fillings in whatever order you want between the cake layers. It is easier prepare each tier separately and assemble on top of each other at the end.
Freeze the cake for around 10mins between applying each layer.
The picture above demonstrates one cake tier: 3 layers of cake with 2 different fillings.
4. Neaten the outside of the cake by filling in the gaps with filling and smooth with a spatula. Make sure that the cake is completely symmetrical, and even. If you need to cut the cake a little, it is easier to freeze it before doing so. The 3 tiers:
Place these tiers in the freezer for at least 30mins before icing.
4. Ice each tier separately. Place the cake on some parchment paper on a wire rack. Make sure the chocolate ganache is cool and of a pouring consistency (if not then warm it very slightly). Pour the ganache over the middle of the cake, help the icing along with a spatula and use it to cover the sides too. Make sure the icing is smooth.
5. If you want to decorate the cake then melt 100g milk chocolate with 50g white chocolate and place in a piping bag with a really narrow tip. Draw some lines on the top of each tier with the chocolate.
6. It's tine to layer the cake. Carefully peel off the parchment paper from each cake and place on top of each other.
7. Decorate the cake with whatever you want or just keep it simple.
8. Cut, enjoy and share.
Sources:
Dessert First Girl
The Sweet Art
Food and Wine
Sweet as Sugar Cookies
A post from Fullest of Life


I am in awe at your cake. You're so talented. I have a sweet treat linky party going on at my blog till Monday night and I'd love it if you'd come by and link your cake up. http://sweet-as-sugar-cookies.blogspot.com/2011/12/sweets-for-saturday-50.html
ReplyDeleteHy,
ReplyDeletejust found your space..
lovely space you have..
awesome presentation with inviting cliks..
three tier cake sounds scrumptiously tasty..
Am your happy follower now..:)
do stop by mine sometime..
Tasty Appetite
Thankyou! I have checked out your blog too, and I love it... I think I will be trying out the recipes as I need to brush up on my Indian cooking skills!
ReplyDeleteWOW!! This cake is amazing. And the breakdown of how to make it with photos so helpful. I wouldn't know where to start but the way you've presented the recipe makes it seem vaguely achievable, thank you!! Lovely blog by the way.
ReplyDeleteJust mouthwatering...looks so easy to prepare & delicious!
ReplyDeletehow high is the cake tin this cake is so amazing i am cooking it for my nana's 70th birthday
ReplyDeleteI actually just used normal cake tins, but made several layers to the cake so that I would get the height. I used 3 different sized cake tins tough to get the 3 different diameters, however I guess you could use one big tin and just cut the cake into smaller pieces if you don't have 3 tins. Hope that helps :)
ReplyDelete